Showing posts with label Cake Pops. Show all posts

Friday, August 16, 2013

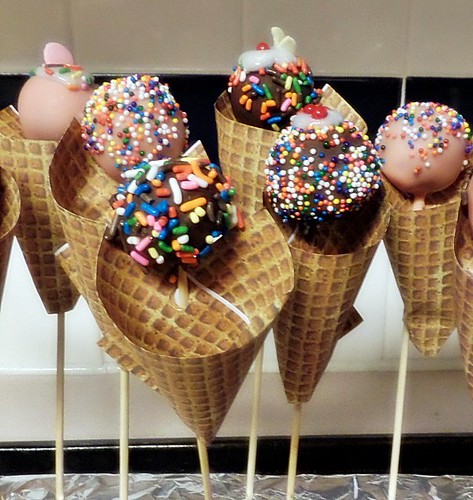
How To Make Ice Cream Cake Pops with Waffle Cone Cake Pop Wraps

ice cream cake pops


INGREDIENTS/MATERIALS
  • Basic Ingredients to Make Cake Pops (can be found in my tutorial on making cake ball pops HERE.) 
  • Almond Bark/Candy Melts/Icing Dye - For Ice Cream Cone Cake Pops coating, you will need whatever color almond bark or candy melts you would like the ice cream to be or white almond bark or candy melts and icing dye in the color(s) you want. 
  • Sprinkles and Candies to decorate or for ice cream "toppings" 
  • Index Cards - 3 in x 5 in, PLAIN NO LINES ON EITHER SIDE
  • Color Printer 
  • Hole Puncher


    A. MAKE WAFFLE CONE CAKE POP WRAPS
    1. Find a Waffle Cone Pattern Image - You can search internet images for a waffle cone pattern and save it to your computer for printing or use the image I used below:

    Ice Cream Cake Pop Waffle Cone Image


    2. Print Waffle Cone Image onto Index Cards - Load index cards into your color printer and print waffle cone image on both sides of cards. Be sure to adjust settings or properties for your printer to recognize the 3 in x 5 in size of the index cards. If your printer doesn't have this size as an option, 4 in x 6 in works just about the same.


    Crafty Gal Tip: Using Photoscape, from the print tab, set paper to "full" at "4 in x 6 in", and under print set-up, make size "4 in x 6 in", then under properties choose "photo printing", "borderless" and "matte photo paper". 

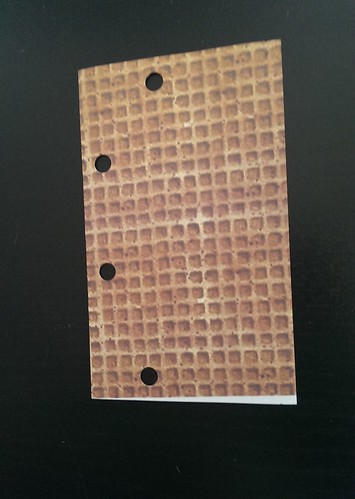
    3. Punch Holes into Waffle Cone Index Cards - Once index cards have your pattern printed on them and they are dry, punch four holes into each card as they are shown in image below:


    cone hole punched ice cream cone cake pops

    4. Put Aside to Dress Cake Pops - This is the final step of the entire process. Don't put the wraps onto cake pop sticks until cake pops are completely finished and right before you arrange them in a presentation for serving or gifting.

    B: MAKE CAKE POP BATCH READY FOR DECORATING

    BEFORE YOU CONTINUE THIS TUTORIAL, you need to perform steps 1-9 of my tutorial on making cake pops which are listed HERE. These steps will take you through making your cake pops and coating them so they are ready for decorating. Remember that the transition from step 9 of "How to Make Cake Pops" (which involves coating the cake pops) to the the rest of this tutorial, "How To Make Ice Cream Cake Pops with Waffle Cone Cake Pop Wraps" consists of only a matter of seconds as your cake pops must be decorated/sprinkled immediately after they are coated with warm candy coating and before the coating begins to dry. 

    C: SPRINLE ICE CREAM CAKE POPSTo add sprinkles to cake pops, you have to be very quick. The coating cannot dry before you decorate or nothing will stick. Dry time begins the moment the pop is removed from the coating and is completely set in about 10 seconds.

    Liberally pour or sprinkle with your fingers the sprinkles onto your freshly coated cake pop rotating the pop in one hand while you sprinkle with the other.

    (To make some of cake pops appear to be topped with whipped cream and cherry or fruit or to be "glazed", you will need to decorate them twice. So you will sprinkle them, then set them in the freezer or refrigerator for a while, then you will decorate them again with icing writers and more sprinkles/candy. You can leave some unsprinkled at first and just add the second topping decorations to the plain coated ones, after they've been frozen/refrigerated, to break up the design a bit.)

    ice cream cone cake pops 4

    D: SET CAKE POPS
    When you are done decorating your cake pops with the first round of toppings, put the pop stick into the foam board (I put them in at a slant so the dough doesn't get too heavy and start to slide down the stick.) and let them set. Again, I have my foam board already in the freezer so when I put each pop into it, the cold air helps them set quicker and avoids dripping or moving of the ball. I like to keep the pops on the foam board in the freezer for 20 mins or until outside is hard and then remove them and place them on a foiled cookie sheet or place in large Ziplocks. Store cool but do not keep in freezer for long periods or the coating will crack and the dough will harden.

    E: DECORATE SOME OF THE CAKE POPS A SECOND TIME OR THE ONES YOU DID NOT ALREADY SPRINKLE
    Once they've set in the freezer/refrigerator and coating and/or sprinkles are in place you can top off some cake pops with additional decorations.Use Icing Writer in white to squeeze a dab of "cream" onto the top of a cake pop.You can then add sprinkles, or candies on top of the "cream" right away or after the cake pop has set in the freezer/refrigerator if the icing is too runny.

    F: SET CAKE POPS
    Put cake pops back into the freezer/refrigerator to set them before wrapping them with the waffle cone wraps. You want cake pops to be firm and dry before you handle them with the wraps.

    G: WRAP CAKE POPS WITH WAFFLE CONE WRAPS
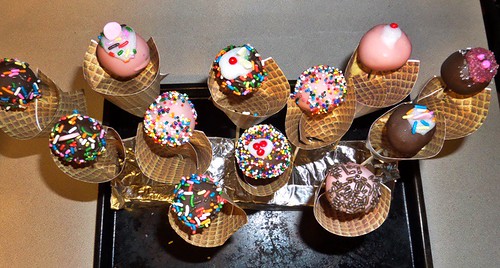
    The image below, from left to right, demonstrates how to attach the waffle cone cake pop wraps to your cake pops sticks.


    cone instructions ice cream cone cake pops


    YOUR FEEDBACK/COMMENTS/QUESTIONS ARE ENCOURAGED AND WELCOME HERE.


    Lemon and Orange Orchard Cake Pops Recipe


    easy cake pop recipe for beginners

    Product Image

    PREFACEBefore you begin to follow this tutorial, you need make cake pop dough. Perform steps 1-5 of my tutorial on making cake pops which are listed HERE. Once you have completed my steps or your own method to make cake ball dough and your dough has set in the fridge or freezer so it is easy to shape, proceed with instructions below to create lemon and orange orchard cake pops.


    INGREDIENTS/MATERIALS

    • Basic Ingredients to Make Cake Pops (can be found in my tutorial on making cake ball pops HERE.) 
    • For lemon and orange orchard cake pops coating, you will need White Almond Bark or Candy Melts and Brown/Tan, Yellow and Orange Icing Dye or Brown/Tan, Yellow and Orange Colored Candy Melts. 
    • Sprinkles to give some depth to the cake pops. 
    • Green Fondant Surgar Sheets. White sugar sheets will work too if you have a green food writer.
    A. CUT OUT LEAVES FROM SUGAR SHEET...SET ASIDEeasy cake pop recipe for beginners
    1. Sugar Sheets Can be Cut with Regular Scissors Just Like Paper.
    I didn't purchase sugar sheets for a while because the store display made it seem like you couldn't use them unless you bought this whole pattern making and cutting system. (I didn't have a green sheet when I began my orchard cake pops so I used a green FoodWriter on a white sugar sheet to draw and color leaves. I ended up at JoAnne's mid-project though so half of my leaves were cut from a green sugar sheet.)


    2. Remember to Remove the Plastic Backing After you Cut Out Your Leaves and before you start to melt your cake pop coating so they are prepped and ready to stick on your cake pops right after dipping.


    3. Then Aside on a dry paper towel.


    B. MAKE DOUGH INTO TERRACOTTA POT SHAPES

    1. Roll Half of Your Dough into Pot Shapes... - Scoop out a small handful of cold dough and squeeze the dough between your hands, rolling it from one hand to the other so the dough is tightly packed. As you knead the dough from hand to hand, start to roll it into a ball and then into a "log". You'll have to work at it a bit to get the terracotta pot shape but as your dough gets packed into a ball/log begin to pound one end on your counter top or palm of  your end at the same time pressing more dough to that same end so you're achieving the pot shape with the top end wider than the bottom. Then roll it out a tad and repeat until you've got a perfect little pot. 


    ...and Half into Fruit Shapes. - Scoop out a small handful of cold dough and squeeze the dough between your hands, rolling it from one hand to the other so the dough is tightly packed. As you knead the dough from hand to hand, start to roll it into a ball. Roll out round cake balls until the rest of your dough is in shapes. You can roll out some small dough balls to mix into your orchard design. It's best to not have all the fruit the same size. 


    2. Freeze to Set - Place your shapes onto an aluminum foil covered cookie sheet and keep in the freezer for about 20 minutes. (Put each shape into the freezer after it's made so the dough can set while you are molding the rest of the dough.) 


    B: MAKE CAKE BALLS INTO CAKE POPS
    1. Prepare your Work Space


    • Foam Board in Freezer - You will need your foam board close or in your freezer. You will be dipping, decorating and setting one cake pop in the foam to dry/set all in the matter of about fifteen seconds so your space will need to be arranged for efficiency. 
    • Dough Balls Near Microwave
    • Aluminum Foil Covering Countertops - I have my foam board in the freezer, my dough balls on a pan next to my microwave, and aluminum foil covering my counter where I coat and sprinkle/decorate the cake balls. 
    Crafty Gal Tip: Skewers Instead of Lollis...I use barbeque skewers for sticks. They are long so I break them in half or start by using scissors to cut them in the middle and then break them on the cut. Lolli sticks work just fine, but they are a bit larger in diameter which makes a larger hole in the cake ball when inserted and ultimately the risk of the cake ball sliding down the stick once they become heavier with the chocolate coating is larger too.


    2. Secure Terracotta Dough Shapes to Sticks - In order to help your dough shapes stay on the sticks, you need to first dunk the sticks into melted almond bark or candy melts (melting instructions in next step) about 1/2 an inch and then put the melted chocolate end of the stick straight into your dough shapes. Push the stick, coated-end into the bottom or less-wide side of the terracotta pot shape and remember to push it through the pot enough so a good inch and a half is exposed so you can add the fruit shapes. Best that make your entire batch of terracotta pot dough shapes into pops, followed by another short vacation in the freezer with sticks in place, and then begin coating them with melted almond bark or candy melts.

    Crafty Gal Tip: Why I Prefer the Microwave to Heat Cake Pop Coating and How to Avoid Burning When Melting and Bubbles or Bleeding from your Final Design...Because I work with different colors and flavors of almond bark/candy coating for one batch of cake balls, I prefer using the microwave over a double boiler/melting pot so I can use multiple microwave safe containers instead of all the scraping, cleaning and reheating that goes along with the one-pot-process. If you have tried and failed with the microwave before, please read on (and view the YouTube tutorial by TastyCakePops). I feel your frustration. I've lived it. I think I've come out on the other side though. 

    C: MELT/DYE COATING
    1. Melt Coating for Terracotta Pots - So you have your dough pops ready for dipping... Grab a few squares of your white almond bark or if you are using candy melts, a couple handfuls and put into a microwave safe container. I've trial/error'd every type of container, mug, bowl, etc. you can think of and it's the small ZipLock containers that are perfect in size as well as conducting and distributing the heat from the microwave evenly so your coating doesn't burn when melting. Fill the container about halfway with candy melts or a couple squares of almond bark and microwave on half power for 30 seconds. Stir contents though not much melting has begun. Microwave in 30 second intervals while stirring in between until melting has taken over about half of the bark/melts. 


    2. Thin Coating with Vegetable Shortening - DON'T BE CRAZY AND SKIP THIS STEP. If you forgot to get shortening, go to the grocery now and save yourself a couple hairs that you would be pulling out of your head should you proceed without it. Add shortening by the tablespoon, stirring then microwaving in 30 second intervals. You may need to add bark/melts to attain a consistency adequate for flawless coating and have enough in your container to be able to dip and engulf the cake ball. 


    (Tasty Cake Pops on YouTube has the best video tutorial on heating candy melts for coating cake balls or cake pops. Her 7 part video series is below.)


    3. Dye Coating - In between heating and thinning your cake pop coating you may need to add food color or icing dye if you are not using colored candy melts. To color white almond bark or candy melts, you want to add food dye the same way you add the shortening, in intervals and in between heatings, stirring until the desired result is achieved. 


    D: COAT TERRACOTTA POT SHAPED CAKE POPS

    1. Dip cake pops into warm coating Once your coating is warm and smooth, you can start dipping the cake pops. Cover the dough shape entirely with the coating, then let excess drip by holding the pop sideways or ball down. Tapping the stick on the side of the melting container while spinning it slowly helps remove excess coating so your coating finish is flawless in texture. 


    2. Add Sugar Sheet Leaves - Position sugar sheet leaves on top of pots (or fruit) immediately after coating.

    E: SET TERRACOTTA SHAPED CAKE POPS

    When you are done decorating your cake pop, put the pop stick into the foam board (I put them in at a slant so the dough doesn't get too heavy and start to slide down the stick.) and let them set. Again, I have my foam board already in the freezer so when I put each pop into it, the cold air helps them set quicker and avoids dripping or moving of the ball. I like to keep the pops on the foam board in the freezer for 20 mins or until outside is hard and then remove them and place them on a foiled cookie sheet or place in large Ziplocks. Store cool but do not keep in freezer for long periods or the coating will crack and the dough will harden.

    F: ADD LEMON AND ORANGE SHAPED DOUGH BALLS TO TERRACOTTA POT CAKE POPS

    Now that you have pots for your orange and lemon plants, you're ready to grow some fruit. So dip the end of sticks into some melted coating and add your dough balls to the end (doubling-up on some with the small dough balls). 


    It may be a good idea to let your pops set a little while again in the freezer before coating the orange and lemon shapes.


    G: COAT AND DECORATE FRUIT SHAPES

    Follow directions to melt and dye the coating for your cake pops (C.) then dip the fruit shapes into the coating (D.) and sprinkle if you'd like. Pour sprinkles over freshly dipped cake pops and freeze immediately.


    YOUR FEEDBACK/COMMENTS/QUESTIONS ARE ENCOURAGED AND WELCOME HERE.


    Campfire Smores Cake Pops Recipe - The Beginner's Dream Theme


     Campfire Smores Cake Pops - Quick and Easy for Beginners 
      
    Preface: Before you begin to follow this tutorial, you need to perform steps 1-5 of my tutorial on making cake pops which are listed HERE. Once you have completed my steps or your own method to make cake ball dough and your dough has set in the fridge or freezer so it is easy to shape, proceed with instructions below to create cute Campfire Smores cake pops.. First say that 3 times, fast!

    Ingredients/Material: 
    • Basic ingredients to make cake pops (can be found in my tutorial on making cake ball pops HERE.) 
    • For Campfire Smores cake pops coating, you will need both white and brown/chocolate almond bark or candy melts and brown/tan icing dye or brown/peanut butter candy melts. By the perfect accident I nabbed marshmallow flavored candy melts from JoAnn's Fabric, a"limited edition". Of course I used them for the marshmallow shaped cake pop coating.
    • Sprinkles to give some depth to the cake pops. I used Glitter Gold Cupcake Gems by Cake Mate to "roast" the marshmallow cake pops and liven up the graham cracker cake pops and chocolate sprinkles on top of the chocolate square cake pops.
    STEP1: MAKE DOUGH INTO CAMPFIRE SHAPES
    • Roll dough into Campfire Shapes - Scoop out a small handful of cold dough and squeeze the dough between your hands, rolling it from one hand to the other so the dough is tightly packed. As you knead the dough from hand to hand, start to roll it into a log, but not a skinny log...more like a log/ball. At the same time pound the ends of the log ball on to your foil covered work space/counter top to flatten the ends like a marshmallow. Roll, pound, roll, pound...the dough will start to take the form of a marshmallow. For grahams and chocolate shaped pops, form by hand basically the same way keeping in mind the width being about 1/2 inch so the skewer or lolli stick can be inserted and balance the dough shapes.2. Freeze to setPut each campfire shape into the freezer after it's made so the dough can set more while you are molding the rest of the dough.
    Crafty Gal Tip: It doesn't hurt to roll some of your dough into cake balls instead of shapes. They nicely break up the design presentation.


    STEP 2: MAKE DOUGH SHAPES INTO POPS


    • Prepare your work space - You will need your foam board close or in your freezer. You will be dipping, decorating and setting one cake ball pop in the foam to dry/set all in the matter of about fifteen seconds so your space will need to be arranged for efficiency. I have my foam board in the freezer, my dough balls on a pan next to my mircrowave, and aluminum foil covering my counter where I coat and sprinkle/decorate the cake balls. Because I work with different colors and flavors of almond bark/candy coating in one batch of cake balls, I prefer using the microwave over a double boiler/melting pot so I can use multiple microwave safe containers instead of all the scraping, cleaning and reheating that goes along with the one-pot-process. If you have tried and failed with the microwave before, please read on. I feel your frustration. I've lived it. I think I've come out on the other side though. I use barbeque skewers for sticks. They are long so I break them in half or start by using scissors to cut them in the middle and then break them on the cut. Lolli sticks work just fine, but they are a bit larger in diameter which makes a larger hole in the cake ball when inserted and ultimately the risk of the cake ball sliding down the stick once they become heavier with the chocolate coating is larger too.
    • Secure dough shapes to sticks - In order to help your dough shapes stay on the sticks, you need to first dunk the sticks into melted almond bark or candy melts (melting instructions in next step) about 1/2 an inch and then put the melted chocolate end of the stick straight into your dough shapes. Best that you repeat this for your entire batch, followed by another short vacation in the freezer with sticks in place, and then begin coating them with melted almond bark or candy melts.
    STEP 3: MELT CANDY MELTS/ALMOND BARK

    • Melt coating for marshmallow shaped pops - So you have your dough pops ready for dipping... Grab a few squares of your white almond bark or if you are using candy melts, a couple handfuls and put into a microwave safe container. I've trial/error'd every type of container, mug, bowl, etc. you can think of and it's the small ZipLock containers that are perfect in size as well as conducting and distributing the heat from the microwave evenly so your coating doesn't burn when melting. Fill the container about halfway with candy melts or a couple squares of almond bark and microwave on half power for 30 seconds. Stir contents though not much melting has begun. Microwave in 30 second intervals while stirring in between until melting has taken over about half of the bark/melts. 
    • Thin coating with vegetable shortening - DON'T BE CRAZY AND SKIP THIS STEP. If you forgot to get shortening, go to the grocery now and save yourself a couple hairs that you would be pulling out of your head should you proceed without it. Add shortening by the tablespoon, stirring then microwaving in 30 second intervals. You may need to add bark/melts to attain a consistency adequate for flawless coating and have enough in your container to be able to dip and engulf the cake ball. "Tasty Cake Pops" on YouTube rocked this procedure in her tutorial. I suggest you watch it if the process isn't quite coming together in text.
    http://www.youtube.com/watch?v=ku4DD3inero

    http://www.youtube.com/watch?v=FIQc29pmavY

    http://www.youtube.com/watch?v=LuxovCIddcQ

    http://www.youtube.com/watch?v=i_iVqNweWZ4

    http://www.youtube.com/watch?v=JDmPdEwgxno

    http://www.youtube.com/watch?v=OJV3YVARQTE

    STEP 4: ICE/COAT CAKE POPS
    • Dip cake pops into warm coating Once your coating is warm and smooth, you can start dipping the cake pops. Cover the dough shape entirely with the coating, then let excess drip by holding the pop sideways or ball down. Tapping the stick on the side of the melting container while spinning it slowly helps remove excess coating so your coating finish is flawless in texture. If you are going to add sprinkles or decorations you have to be very quick. The coating cannot dry before you decorate or nothing will stick. Dry time begins the moment the pop is removed from the coating and is completely set in about 10 seconds.
    STEP 5: SPRINKLE MARSHMALLOW CAKE POPS FOR "ROASTED LOOK"
    • Pour a mound of gold sprinkles onto a sheet of aluminum foil and dip cake pops, immediately from being covered with warm coating into the mound so just the flat end of the cake pop is covered. 
    STEP 6: SET CAKE POPS
    When you are done decorating your cake pop, put the pop stick into the foam board (I put them in at a slant so the dough doesn't get too heavy and start to slide down the stick.) and let them set. Again, I have my foam board already in the freezer so when I put each pop into it, the cold air helps them set quicker and avoids dripping or moving of the ball. I like to keep the pops on the foam board in the freezer for 20 mins or until outside is hard and then remove them and place them on a foiled cookie sheet or place in large Ziplocks. Store cool but do not keep in freezer for long periods or the coating will crack and the dough will harden.

    STEP 7: COATING/DECORATING FOR GRAHAM AND CHOCOLATE CAKE POPS
    • Once you've completed your marshmallow cake pops, you'll want to repeat the process (Steps 3 and 4) for the other shapes which require different colors of coating. Chocolate square cake pops can be coating simply by using brown/chocolate almond bard or candy melts. No adjustments need to be made to the process described above. The graham shaped cake pops coating can also be as simply if you can find tan and/or peanut butter candy melts. If not icing dye will do just find by slowly mixing a bead of color on the end of a toothpick into your melting/thinning process and in between heatings until you get desired shade. Sprinkling graham and chocolate cake pops can be done the same way by dipping into a mound of sprinkles (same gold for grahams and chocolate for chocolate) or by actually sprinkling with your fingers or out of the bottle over the coated pops.


    YOUR FEEDBACK/COMMENTS/QUESTIONS ARE ENCOURAGED AND WELCOME HERE.

    Scotty Dog and Bones Cake Pops Recipe


    PREFACE/VERY IMPORTANT: Before we even begin to talk Scotties and Milk Bones, you need to perform steps 1-5 of my tutorial on making cake ball pops which are listed HERE. Once you have completed my steps or your own method to make cake ball dough and your dough has set in the fridge or freezer so it is easy to shape, proceed to my instructions for creating Scotty dog and bone cake pops.

    Ingredients/Materials: 
    • Basic ingredients to make cake ball pops (can be found in my tutorial on making cake ball pops HERE)
    • White almond bark or candy melts
    • Icing dye or food coloring in black and brown
    • Confetti style (flat, circular) sprinkles (specifically white ones if you want your Scotties to have eyes) 
    • Yellow sprinkles (the ones that are long not round)
    • Icing for writing gel in white and brown

    • Black Foodwriter edible marker (Optional for eyes...Can use dyed coating from Scotties instead)
    • Red icing for writing (not gel)
    • Scotty dog and bone small cookie cutters (I got cutters used for this project at Hobby Lobby. They are called "mini cutters" and are made by Sunny Side Up Baking Essentials. You can purchase my Scotty dog and bone ones in a pack of 6 online HERE). 
    A. Make Dough into Dogs and Bones

    Prepare your station with a cutting board or pan covered with wax paper or foil. You should scoop out a handful of cold dough and squeeze the dough between your hands rolling it from one hand to the other so the dough is tightly packed and doesn't separate or crack when you use the cutters to shape it. Place the mound of dough on your foil or wax paper and pound it like a patty with the palm of your hand only a few times so the inside of your Patty is about 3/4 - 1 inch in thickness. Use your cookie cutters to create the dog and bone shapes one shape at a time or as many as you want from each Patty. Put each shape into the freezer after it's cut out so the cake can set more while you are cutting the others. It also doesn't hurt to roll some of your dough into cake balls instead of shapes. I think they nicely break up the design when in presentation.

    STEP 1: PREPARE CAKE POP COATING
    • Arrange Your Work Space so it is Functional - Before you continue working with your cake shapes, take a minute to make sure you are READY to proceed...IMPORTANT: IMMEDIATELY after you've prepared your dipping chocolate so it is the right color and temperature, you will be working with it to make the pops and coat the cake so you will need to make sure your work space is clean and efficient. Keep your foam board close to your dipping station or in your freezer. It is best to put your foam board in the freezer and put your pops in it, one-by-one, after you've coated each. You will be dipping, decorating and setting one pop at a time, all in the matter of about fifteen seconds so the "flow" of your space is vital to your result. I have my foam board in the freezer, my dough shapes on a pan covered with aluminum foil next to my microwave, and aluminum foil covering my counter where I may sprinkle/deco the pops after I dip them. 
    • Melt Chocolate - Grab a few squares of your white almond bark or if you are using candy melts, a couple handfuls and put into a microwave safe container. I use an old Duncan Hines icing jar. It's plastic and deep like a mug which is perfect for dipping...OR use a large coffee mug. Put your chocolate in the microwave and start heating checking periodically and stirring until consistency is smooth. I have to set my microwave at power 6 or 7, otherwise, burn baby burn! It is easy to overheat the chocolate and then it is not salvageable. You must check and stir every 15-30 seconds. You may need to STIR in a little water, condensed milk or Crisco (not oil but the spread that comes in a can) in between heatings, to make the chocolate thin enough to enclave the balls easily...Careful here though. If you feel you DO need to thin the chocolate, add your choice of thinner little by little, stirring and heating in increments. Your mixture will reach it's temperature perfect for dipping and if you are under or over by a few seconds, it won't be easy to work with or you won't be able to work with it at all. If you are a first timer, hang in there. I've thrown lots of burnt or runny or clumpy chocolate. 
    • Add Icing Dye/Food Color to Chocolate - Adding your color can be tricky as well. You have to wait until the chocolate is melted so you can smoothly integrate the coloring and achieve an even shade, then you have to heat the chocolate some more to make up for the liquid coloring which more than likely made your chocolate cool a bit. I used icing dye in black, dropping pea size servings into the chocolate and stirring until my coating was black, not grey. 
    • PROMPTLY Move Forward to Step 2.
      STEP 2: MAKE CAKE SHAPES INTO POPS AND COAT
      You are about to realize the importance of your work station set-up. Your chocolate is warm and creamy and ready for it's first dip...but the first dip comes from dipping your skewer/lolli stick, not your cake shape.
      •  Use Skewers/Lolli Sticks to Make Dough Shapes into Cake Pops - Grab a stick and dip it about 1/4 inch into the melted chocolate. Take a cake shape and while nestling it in one hand, carefully/slowly slide your skewer/lolli stick into it being cautious of pushing the stick too far where the cake risks sliding DOWN the stick after coated in chocolate, and also being leery of not pushing it in far enough where your cake could fall OFF the stick after coated. I don't mean to speak like it's a crap-chute and you definitely get the hang of it with practice. 
      • Coat Cake Pops with Melted Chocolate - Immediately after you've made a shape into a pop, dip the cake end of the pop into the coating so the chocolate enclaves the shape right up until where it meets the stick. You'll find yourself tipping the container of chocolate at somewhat of a 45% angle while maneuvering the cake shape around slowly and carefully so it gets covered evenly. Do not double dip. If you've made your coating correctly, one dip should cover the entire cake shape and the excess should drip off easily as you hold the pop upside down or on its side over the container. You may cautiously tap the stick on the end of the container to ensure all excess coating drips off. 
      • Add Deco if Needed - If you've decided to make your Scotties have eyes like the photo, now is the time to place one white confetti sprinkle where the eye would be while the chocolate is soft on the cake pop. 
      • Freeze Coated Cake Pops to Set - Back in the freezer boys...place each coated, eyed, Scotties in foam board in freezer to set while you work on the rest but you don't want to leave them freezing after you've finished coating and eyeing the dogs. Transfer them to the refrigerator to avoid bubbles or cracks in the coating. 
      STEP 3: REPEAT STEPS 1 AND 2 for BONE SHAPED DOUGH
      The only adjustments you will be making when you repeat B and C for your bones, will occur at B3 where you will replace black dye for icing with brown, adding smaller amounts at a time so you can achieve the beige Milk Bone shade, and C3 which you will skip entirely.

      STEP 4: EMBELLISH SCOTTY DOG SHAPED CAKE POPS
      Your dog shaped cake pops should be nice and cool after setting in the fridge so let's get a pretty plaid sweater on them.
      • Draw Sweater onto Scotty Dog's Body - Use your red icing writer to outline a sweater onto the dog's body. Then, with the same writer, color in the sweater but be conservative because the icing has to stay put, not slide off. It helped me to squeeze some icing in the middle of the sweater and use a toothpick to spread it out thinly.
      • Place Yellow Sprinkles onto Scotty Dog's Sweater in a Plaid Pattern - Using tweezers, yes TWEEZERS, gently grab one yellow sprinkle at a time and place it onto the red icing of the sweater.
        (This part is the most time consuming, although as with almost every other step of making/decorating cake pops, it begins to be a piece of "cake" after you've decorated your 3rd or so pop.) The plaid pattern is easiest accomplished by placing the sprinkles in 3 rows of Vs, with the Vs of alternating rows upside down...like so:
        /\/\/\/\\/\/\/\/
        /\/\/\/\
        You will be placing the rows right on top of each other so there will be no spaces like the figure above and the Vs from one row will connect with the Vs on the next row so the 3 rows of connected Vs will look just like plaid print.
      • Add Black Dot to Eye of Scotty - If you chose to give your Scotties a white confetti sprinkle for an eye, complete it by making a black dot on the sprinkle with your Foodwriter edible marker or dot the white sprinkle a toothpick dipped in your batch of melted, black, chocolate coating.
      • Freeze to Set Completed Cake Pops - After deco is complete, always set pops in the freezer, then transfer to refrigerator.
      STEP 5: EMBELLISH BONE SHAPED CAKE POPS
      No bullets necessary for this. Simply use your white and/or brown gel icing writers to outline the bones and squeeze out 3 linear dots in the middle of the bones. Freeze to set. Then refrigerate.

      FINALLY, ENJOY!
      YOUR FEEDBACK/COMMENTS/QUESTIONS ARE ENCOURAGED AND WELCOME HERE.

      Music Note Cake Pops Recipe


      PREFACE/VERY IMPORTANT: This tutorial begins after cake ball/cake pop dough has been made from baking a cake, letting it cool, mixing the cake with frosting or other mixer and freezing the dough. If you need instructions on how to make cake ball pops to this point, follow steps 1-5 found HERE, then proceed with this tutorial. If you're already adept at the skill of cake balling, then you probably know where to start following my instructions on making them into music notes (after you've created your "dough" and let it chill in fridge or freezer).

      Ingredients/Materials: White almond bark or white candy melts, colored icing writing gel or icing for writing, a picture of the music notes you wish to create handy (if free-handing shapes) and small but sharp knife or blade.

      STEP 1: CREATE THE NOTE SHAPES FROM YOUR COLD DOUGH
      We begin with your cold cake mixture or dough. Because, I made my music notes free-handed, without the use of a cookie cutter, I took parts of the dough at a time to work with and I cut one shape at a time. If you don't trust yourself to draw the notes by looking at a figure, you may want to start Googling "off the beaten path cookie cutter shapes" or maybe just "music note cookie cutters":).
      • Make a Dough "Patty" - Grab a handful of your dough mixture and throw it on a cutting board covered with wax paper or aluminum foil. Pound it with your hand a couple times so the width is even. The middle of the "patty" should be approx. 3/4 inch. 
      • Place Your Music Note Image Where You Can See it for Reference or Place it on Top of "Patty" to Trace
      • Draw Music Note Shape in "Patty" with Tip of Knife - I used the point on the end of a knife to draw my note into the middle of my "patty" making sure to cut the shape all the way through the dough. 
      • Peel Away the Dough from Around your Shape and Repeat - Set your cut outs on a pan covered with wax paper or foil and keep it in the freezer. So with each note you make, you should add it to the bunch setting in the freezer. Sooo easy peasy. 
      • Mix Up Shapes - I made a couple different note styles and then some regular round cake balls so my bouqet had variety.

      STEP 2: MAKE MUSIC NOTES INTO POPS
      When your shapes are cool and hard enough to work with without getting mis-shapen easily, you can put your skewers or lolli sticks into them.
      • Slide Skewer or Lolli Stick into Cold Dough Shapes - You'll need to strategically and carefully glide the sticks into the shapes one by one and place them flat down on your sheet in the freezer while preparing your dipping chocolate.
      STEP 3: PROCEED WITH COATING YOUR POPS BY FOLLOWING STEPS 8-10 FOUND HERE

      STEP 4: DECORATE COATED MUSIC NOTE CAKE POPS
      Now your pops are cool again and ready to decorate. Your music notes may not look very much like they are supposed to. They could even look like down right blobs on a stick. That's why this last step is necessary.
      • Outline Shapes with Icing for Writing - You're basically going to trace the outline of each note with icing writer gel or icing for writing on cakes with. Some you can color in with your writer after you've made your outline and some you can leave as outlined only. The pop in the pic that looks like it has a record on it is just a candy melt that I stuck onto the cake ball pop right after I dipped it in the coating so the candy stuck to it. Then when set, I used my black and red writers to make the record.
      STEP 5: SET CAKE POPS IN FREEZER
      Put your pops in the freezer or fridge to set the gel icing so it is less likely to run or melt. I think it is better, in this case, to have pops lying down while they set or until you are ready to make your presentation.

      ENJOY! YOUR FEEDBACK/COMMENTS/QUESTIONS ARE ENCOURAGED AND WELCOME HERE.

      Sunday, August 4, 2013

      Happy Hour Martini Cake Balls Recipe

      I've been experimenting quite a bit with these little guys...and they've become a staple outlet for my manic creativity urges...or splurges. I've trial and error'd my way through all the internet recipes and tips/tricks for making cake pops and I'm currently devoted to a pretty honed in process. It is my pleasure to share it with you and hopefully you can use it or take from it what you need for your process. Because anyone who has attempted cake pops knows it is not a simple as it seems and almost every step requires the skill of seasoned cake popper to avoid the "1 good pop for every 10 bad ones" technique. Read on to learn my steps on how to make cake pops and scroll down to follow my steps to decorating your cake pops like my Happy Hour Martini ones.

      How to Make Basic Cake Balls/Cake Pops


      Basic Ingredients - Cake mix (and ingredients to bake a cake), jar of icing, sweetened condensed milk, vegetable shorting in block form, almond bark or candy melts, skewers or lolli sticks, foam board, sprinkles or candy to decorate.


      STEP 1: FLAVOR COMBINATION
      A basic cake ball's consistency is very...well, basic. Cake and icing. So you want to get your box of cake mix (and ingredients needed to bake it) and jar of icing, taking into consideration flavors that compliment each other. I have recently become more adventurous using other mixing agents other than icing from a jar (like Nutella and condensed milk) but at first, I stuck to...the basics:) Some ideas: Strawberry cake and strawberry icing, chocolate cake and chocolate icing, lemon cake and lemon icing, red velvet cake and cream cheese icing, and brownie mix and milk chocolate icing, white cake and vanilla whipped icing adding package of powdered icing flavoring.


      STEP 2: BAKE A CAKE
      If you're using a mix, simply follow the instructions on the box. Bake it just as you would if intended result was an entire cake.

      STEP 3: DESTROY A CAKE
      Let the cake cool enough so you aren't burning yourself handling it but cooling is not for any other reason than that. So whenever you can stand it, dig in! I cut the cake into equal sections and start crumbling each section, with my hands, over a large mixing bowl until the whole cake is devolved into crumbles. DO NOT CRUMBLE THE CAKE INTO DUST OR SUPER FINE PIECES. Once you add your icing or mixing agent you still have a lot of kneading and breaking down of the cake to do and if you are working with such a fine mixture, your cake balls will be waaaaay too doughy and gooey. A couple taste tests resulting in, "PLEGH! (Spitting out of cake ball bite) This isn't cooked!" and you'll understand.

      STEP 4: ADD ICING OR CREAM
      Adding icing into your crumbled cake will give you a yummy, easy to roll and shape dough. So many recipes I've read call for 1 jar or icing to 1 box cake mix but I find (and my taste-testers agree) that a whole jar of icing is way too much. It makes the cake balls too liquidy and under-baked tasting and also too sweet. I suggest 1/3 to 1/2 jar of icing to 1 cake mix. Taste-testers also gave two thumbs up to cake balls in which I added sweetened condensed milk coupled with whipped icing to the cake...I used about 1/4 jar whipped icing and about 1/4 cup sweetened condensed milk. Once you've made a few batches, you will be able to eye-ball it and know when you've got THE mix depending on the consistency. Using a fork works great to blend the icing into the crumbled cake until icing is distributed into the mixture evenly and you have a dough. (One box of cake mix makes a large batch of cake balls so I suggest using a couple different flavors of icing/mixing agents after crumbling the cake into two bowls or three if you have three different mixing agents or icing flavors. Again the powered icing flavor packages come in handy here so you're not opening several jars of icing and dumping or saving and never using the rest.)


      STEP 5: REFRIGERATE/FREEZE DOUGH
      Stick your bowl of dough in the freezer for 15 mins. This will make it easy to roll the mixture into balls/shapes. You can save the mixture to roll for later or even another day by keeping dough in refrigerator or freezer but be sure to cover if you do to avoid any fragrance from other foods seeping into your dough. Nothing worse than "Fish Taco Cake Balls".
      STEP 6: ROLL DOUGH INTO BALLS/SHAPES
      From your dough bowl, you are going to pull out chunks and roll into balls 1 inch in diameter. I've found an inch and a half to be too big! Once you've iced/decorated inch and a half dough balls, they are too heavy to maneuver, especially on sticks (they fall off), AND half the treat gets tossed in the trash anyway because people cannot eat a whole one at an inch and a half. Place each perfectly round ball onto a pan covered with aluminum foil or wax paper and refrigerate/freeze again for 15 minutes. You can save the balls to ice for later or even another day by refrigerating or freezing with cover.

      If you are making Happy Hour Martini cake balls, do NOT proceed to step 7 but scroll down to the How To instructions below. Onward to step 7 to continue traditional cake pops.

      STEP 7: MAKE DOUGH BALLS INTO POPS
      You will need your foam board close or in your freezer. You will be dipping, decorating and setting one cake ball pop in the foam to dry/set all in the matter of about fifteen seconds so your space will need to be arranged for efficiency. I have my foam board in the freezer, my dough balls on a pan next to my mircrowave, and aluminum foil covering my counter where I coat and sprinkle/decorate the cake balls. Because I work with different colors and flavors of almond bark/candy coating in one batch of cake balls, I prefer using the microwave over a double boiler/melting pot so I can use multiple microwave safe containers instead of all the scraping, cleaning and reheating that goes along with the one-pot-process. If you have tried and failed with the microwave before, please read on. I feel your frustration. I've lived it. I think I've come out on the other side though. I use barbeque skewers for sticks. They are long so I break them in half or start by using scissors to cut them in the middle and then break them on the cut. Lolli sticks work just fine, but they are a bit larger in diameter which makes a larger hole in the cake ball when inserted and ultimately the risk of the cake ball sliding down the stick once they become heavier with the chocolate coating is larger too. In order to help your balls stay on the sticks, you need to first dunk the sticks into melted almond bark or candy melts (melting instructions in step 8) about 1/2 an inch and then put the melted chocolate end of the stick straight into your dough balls. Best that you repeat this for your entire batch, followed by another short vacation in the freezer with sticks in place, and then begin coating them with melted almond bark or candy melts.

      STEP 8: MELT/DYE CHOCOLATE
      So you have your dough pops ready for dipping...
      Grab a few squares of your white almond bark or if you are using candy melts, a couple handfuls and put into a microwave safe container. Again, I've trial/error'd every type of container, mug, bowl, etc. you can think of and it's the small ZipLock containers that are perfect in size as well as conducting and distributing the heat from the microwave evenly so your coating doesn't burn when melting. Fill the container about halfway with candy melts or a couple squares of almond bark and microwave on half power for 30 seconds. Stir contents though not much melting has begun. Microwave in 30 second intervals while stirring in between until melting has taken over about half of the bark/melts. Now it's time to add the vegetable shortening to thin the coating. DON'T BE CRAZY AND SKIP THIS STEP. If you forgot to get shortening, go to the grocery now and save yourself a couple hairs that you would be pulling out of your head should you proceed without it. Add shortening by the tablespoon, stirring then microwaving in 30 second intervals. You may need to add bark/melts to attain a consistency adequate for flawless coating and have enough in your container to be able to dip and engulf the cake ball. "Tasty Cake Pops" on YouTube rocked this procedure in her tutorial. I suggest you watch it if the process isn't quite coming together in text.

      http://www.youtube.com/watch?v=ku4DD3inero

      http://www.youtube.com/watch?v=FIQc29pmavY

      http://www.youtube.com/watch?v=LuxovCIddcQ

      http://www.youtube.com/watch?v=i_iVqNweWZ4

      http://www.youtube.com/watch?v=JDmPdEwgxno

      http://www.youtube.com/watch?v=OJV3YVARQTE

      http://www.youtube.com/watch?v=W8qpH6i2MRQ

      Color Coating - If you are using white almond bark/candy melts and want your coating to be colored, add food coloring or icing dye, a little at a time in between heatings/stirrings until desired tint achieved.

      STEP 9: ICE/COAT YOUR POPS
      Once your coating is warm and smooth, you can start dipping the cake pops. Cover the ball entirely with the coating, then let excess drip by holding the pop sideways or ball down. Tapping the stick on the side of the melting container while spinning it slowly helps remove excess coating so your coating finish is flawless in texture. If you are going to add sprinkles or decorations you have to be very quick. The coating cannot dry before you decorate or nothing will stick. Dry time begins the moment the pop is removed from the coating and is completely set in about 10 seconds.

      STEP 10: SET YOUR POPS
      When you are done decorating your cake pop, put the pop stick into the foam board (I put them in at a slant so the ball doesn't get too heavy and start to slide down the stick.) and let them set. Again, I have my foam board already in the freezer so when I put each pop into it, the cold air helps them set quicker and avoids dripping or moving of the ball. I like to keep the pops on the foam board in the freezer for 20 mins or until outside is hard and then remove them and place them on a foiled cookie sheet or place in large Ziplocks. Store cool but do not keep in freezer for long periods or the coating will crack and the dough will harden.


      (Click foam board image to purchase.)

      Decorating Happy Hour Martini Cake Pops
      (Mini plastic martini glasses bought at Party City)


      Ingredients/Materials - Green food coloring or food coloring gel, white almond bark or white candy melts and plain M&Ms (orange).


      This really is the easiest deco idea I've done...and easiest not to mess up. All my olives looked pretty perfect.

      Once you are ready to make your cake balls turn into martini olives (after completing steps 1-6 above) you just need to be ready with green food coloring or food coloring gel and orange plain M&Ms. BEFORE YOU PUT YOUR STICKS INTO YOUR DOUGH BALLS, you need to make a hole for the M&M to stay inside the cake ball to make the orange interior of the olive. If you simply dip the cake ball into the melted chocolate and expect the M&M to stick to the chocolate, you'll be playing a little game I like to call "SH*T!". The candy won't stick for very long and it won't look like a real olive with the inside on the outside anyway.

      So take your dough ball and while holding it in your hand, push your M&M through it about 1/3 of the way. While the M&M is in the ball, reshape the ball, rolling it between your palms so it is round because it will have flattened a bit when you push in the M&M. You need to roll it back into a ball but keeping the M&M just at the surface so the M&M hole is prominent but not too deep and you can pluck out the M&M once your desired shape is achieved. Put the M&M to the side as you will reuse same M&M in a second.

      For my stick or "tooth pick" (tooth pics are too small and too thin and the cake ball will plop off or it will be too hard to dip into the chocolate) I use skewers again. The skewers that I had cut in half for my usual cake balls I cut into half again.  Gently push the skewer threw the dough ball with the M&M hole facing out. I use two cake balls to one stick for this project because I thought two olives looked better than one, especially if you put them in the mini plastic martini glasses. So, hold first dough ball in between thumb and fore finger while pushing stick all the way through leaving just enough space for another ball to be added on to the end, and just a smidge of stick in between the two. If you leave this small space in between the balls, when you dip them into the chocolate, the chocolate will seep in between them a little really making it look like two olives instead of a uni-olive.

      Once both dough balls are on the stick, you are ready to dip. White almond bark can be colored green with food coloring as instructed in Step 8 above. Dip your dough balls into the warm, melted coating, tap excess off and place orange M&Ms, logo down, into the pre-made spaces in each ball. Continue to Step 9 above to set cake balls.

                      
      (Click on candy coating dye image to purchase.)


      YOUR FEEDBACK/COMMENTS/QUESTIONS ARE ENCOURAGED AND WELCOME HERE.